Singtel Group is Asia’s leading communications group, with their headquarters in Singapore. They provide a diverse range of services including fixed, mobile, data, internet, TV, InfoComm’s technology (ICT) and digital solutions.
System Preparation
Network Topology
To use a SingTel SIP Trunk with 3CX, the Call4tel NX-32 device has a second network card (LAN) which is used specifically for traffic to and from the SingTel servers. The network topology should look similar to the above.
WAN should connect to the main WAN through which the 3CX Server accesses the internet. It will also be the interface to which the extensions are connected to.
LAN will only cater for traffic to and from the SingTel servers.
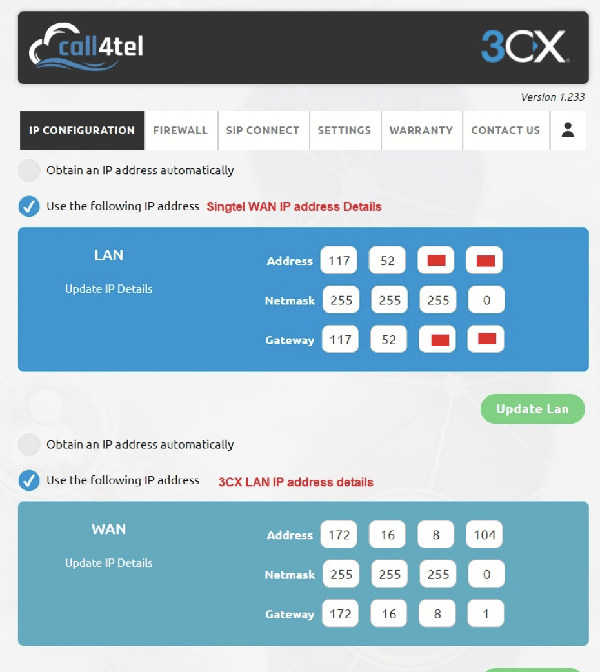
NX-32 Device Interface Configuration Setup
For WAN, apply the necessary network settings required by your network.
For LAN, manually configure the SingTel WAN IP address that was given to you and follow SingTel’s instructions.
Important: WAN is the Default Gateway for all outgoing traffic from the NX-32 Device.
Adding Static Routes
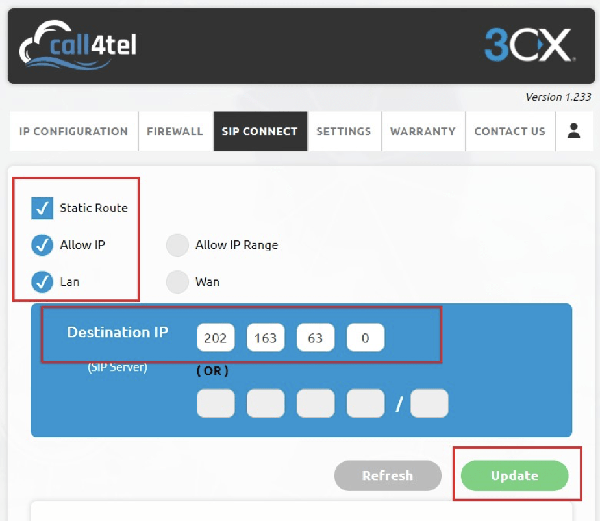
Add a static route so that the traffic from 3CX to the SingTel servers is routed through the correct LAN Interface. To do this navigate to the “SIP CONNECT” tab in the Call4tel portal. Once added click “Update”.
3CX Version
Some providers obtained support and compatibility with 3CX on a specific product version. It is advisable to always run the latest version of 3CX to ensure ongoing compatibility.
Minimum 3CX Version: 15.5
Provider Capabilities
Below is a short overview of the provider’s capabilities and services and whether they’re supported:
CLNS (Clip No Screening): No
Catch All Routing: Yes, static SI per trunk
Fax in T38: No
CLIR (Number Suppression): No
DTMF via RFC 2833: Yes
Codec Order: G729, G711U, G711A
NAT Support: Yes
Other: SRTP is not supported, TLS is not supported
Collecting 3CX Configuration Settings
In order to configure SingTel with 3CX, you should first make sure you have the following information available which must be provided to you by your SingTel representative:
Your DID numbers
The SingTel SIP Server IP address
Your SingTel WAN IP Address
With the above information you can proceed to the next section which explains how you use this information to configure the Trunk in 3CX.
Configuring the Trunk with 3CX
Adding the Trunk
The general instructions outlining how to add a new SIP Trunk to your 3CX installation can be found here.
Additionally, for SingTel, you must also have a dedicated NIC(LAN) for the traffic from/to the Provider. The instructions for this are provided in the section “System Preparation”and must be done beforehand.
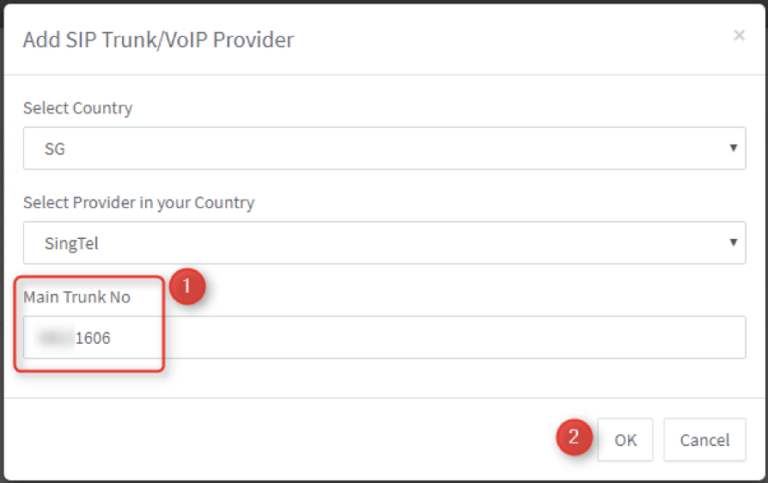
To add SingTel to your 3CX system, open the Management Console and navigate to “SIP Trunks”. Press the “Add SIP Trunk” button and select “SG” as the country and then “SingTel” from the drop-down.
In the “Main Trunk No” field, enter one of your DID numbers, then press OK.
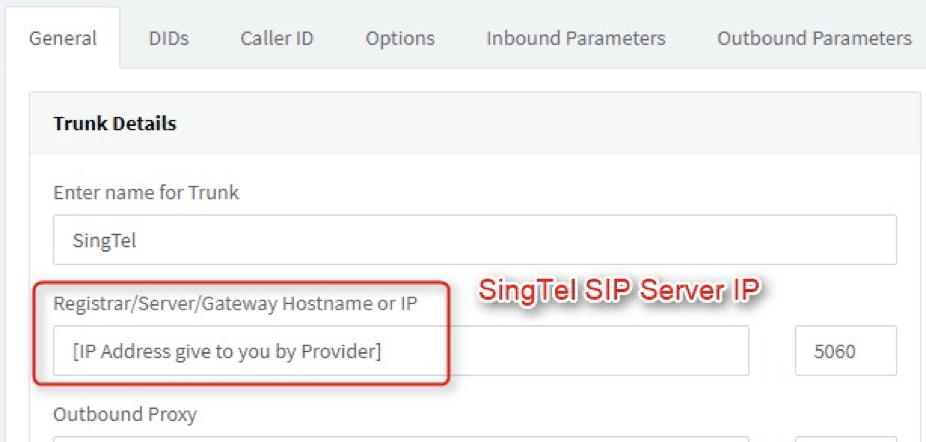
In the “General” tab fill in the SingTel SIP Server IP given to you by the Provider in the “Registrar” field:
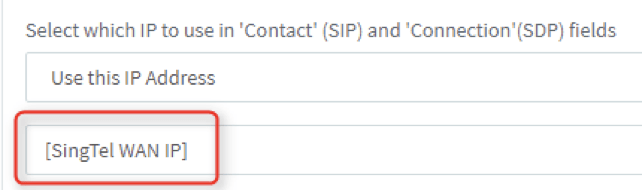
Go to the “Options” tab and in the “Advanced” section, fill in the SingTel WAN IP you have been given.
Press “OK”. Your trunk is now configured.
Adding Additional DIDs
To add more DIDs to your SingTel Trunk, go to the Management Console → SIP Trunks, double-click on your SingTel Trunk and go to the “DIDs” tab.
Here you should already see one entry – the Main Trunk number you set. Add all other DIDs/Numbers you have to the list in the National Number format.
Creating Inbound Rules
Now that you have associated all your DIDs/Number with your SIP Trunk in 3CX, you can create Inbound Rules. To do this, follow this guide.
Number Format
Outbound Caller ID
When making Outbound Calls using your SingTel SIP Trunk, you can present any of your DIDs as the Outbound Caller ID.
Note: Because “Clip No Screening” is not supported, you cannot present any other number that you don’t have associated to your Trunk.
Outbound Rules
You can also set your outbound rules at this point. More information on how to do this can be found here.
Scroll to Top
×
End Conversation?
Are you sure you want to end this conversation?
Powered by RingQ
Typically replies in seconds
Step 1 of 2
How satisfied are you in overall experience at RingQ ?