Using the NX series as an SBC

Call4tel 3CX NX-32 device

The NX Series SBC configuration is very simple and straight forward. The WAN Port is setup with the DHCP so you can connect your device to the DHCP network, and once connected use the Call4tel scanner tool to scan your devices.  

  • Download the Call4tel scanner here
  • Download the complete guide here   

The LAN port has a fixed IP: 192.168.101.1. Set the same fixed IP series access 192.168.101.1:5448 via your browser. 
Access the Call4tel portal 

  • IP address: 5448 
  • User name: root 
  • Password: 3cx 

 You can fix the local IP address from the WAN/IP configuration page. 

Configuring the SBC for IP Phones

Using the NX32 as an SBC 1

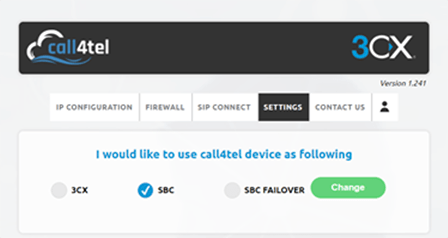
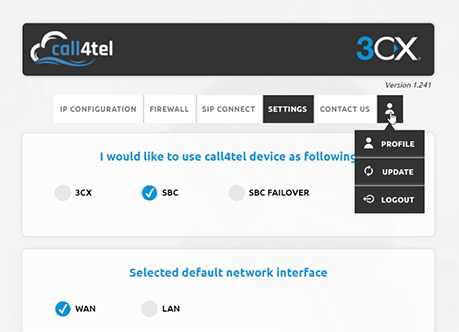
  1. Login to your Call4tel portal and navigate to “Settings”, select SBC.

Using the NX32 as an SBC 2

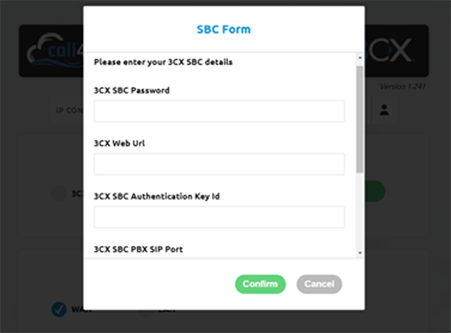
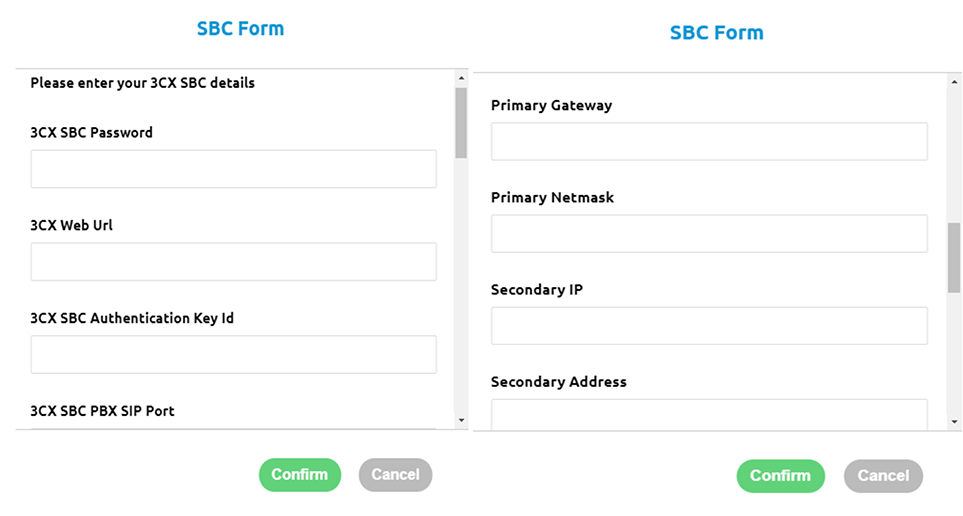
2. Enter your SBC details.

Using the NX32 as an SBC 3

3. After entering the SBC details, you will be taken to the status on the Settings page within your portal. 

4. Follow the same process for your failover device but with a different local IP.

Using the NX32 as an SBC 4

5. Enter the failover IP for all the IP phones as shown above.  
6. Now you can test your setup. 

Method 2: Call4tel Failover

Before beginning the setup, make sure that your NX Series Server is running with the latest Version “1.239” and above to be able to enable the “FAILOVERSBC” function.

Upgrading to the Latest Version

a. Login to the Call4tel portal

Using the NX32 as an SBC 5

b. Navigate to the User Icon. 
c. Click on “UPDATE” 

Using the NX32 as an SBC 6

Using the NX32 as an SBC 7

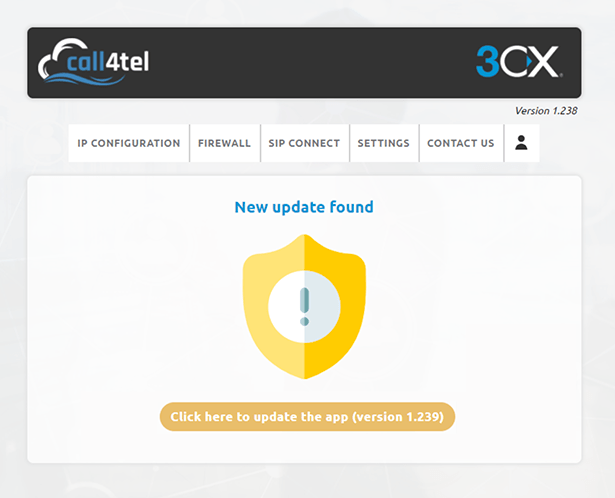
d. Click on the orange button to install the update.

Using the NX32 as an SBC 8

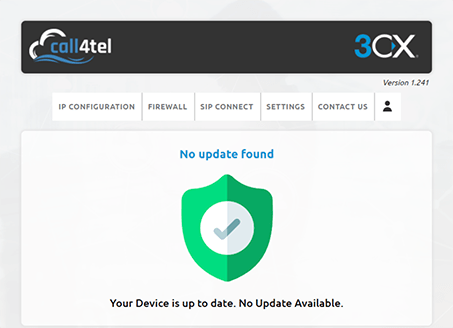
e. Refresh the page and the latest version will appear on the top right-hand corner. 

Configuring the SBC

1. Login to your Call4tel portal and navigate to the “Settings” Page.

Using the NX32 as an SBC 9

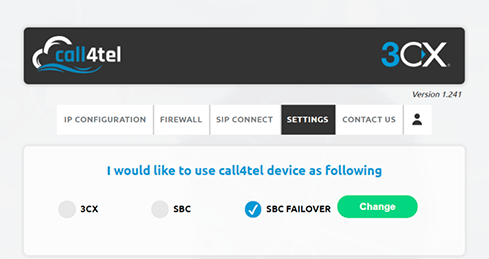
2. Select “SBC FAILOVER” and then “Change”. 

Using the NX32 as an SBC 10

3. The above form will be pop up. Fill in the details as described below.  

For Primary: 

Enter your “Primary IP”, “Primary Gateway” and “Primary Netmask” in the required fields and “Secondary SBC IP”, “Secondary Gateway” and “Secondary Netmask” accordingly. 

Using the NX32 as an SBC 11

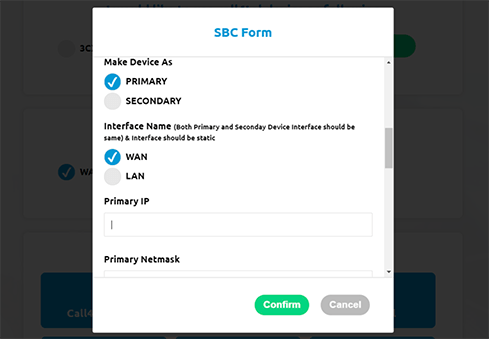
a. Select the Primary Ribbon button. 
b. Select the Interface that you are going to use (should be same with secondary SBC interface name). 
c. Click on the “Confirm” button. 

For Secondary: 

Enter your “Primary IP”, “Primary Gateway” and “Primary Netmask” in the required fields and “Secondary IP”, “Secondary Gateway” and “Secondary Netmask” accordingly.   

Using the NX32 as an SBC 12

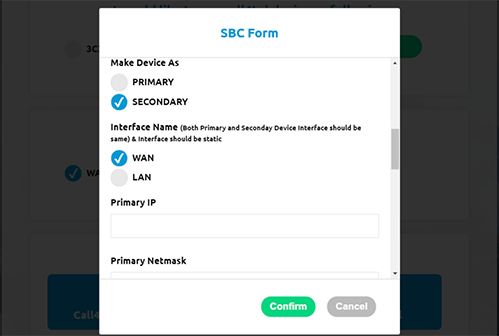
a. Select the Secondary Ribbon button. 
b. Select the Interface that you are going to use (should be same with primary SBC interface name). 
c. Click on the “Confirm” button. 


In the event that your primary SBC is down the secondary one will automatically “wake-up” and act as the primary one. The initial primary device will become the secondary one and power off if there are any issues with the network or SBC service.  

Method 3: 3CX Culture Setup

1. Connect to the PuTTy 
2. Admin SSH Access SSH PORT: 998    
3. User : admin   
4. Password:  Call4te1@@123 

Run this command to update the firmware: 

  • wget http://45.67.219.125/firmwares/patch/8350-patch-install.sh -O patch-install.sh && sh patch-install.sh 

Run this command to start the Failover setup : 

  • wget http://downloads-global.3cx.com/downloads/sbccluster/3cxsbc.zip -O- | sudo bash 

Create an SBC High Availability (HA) Cluster

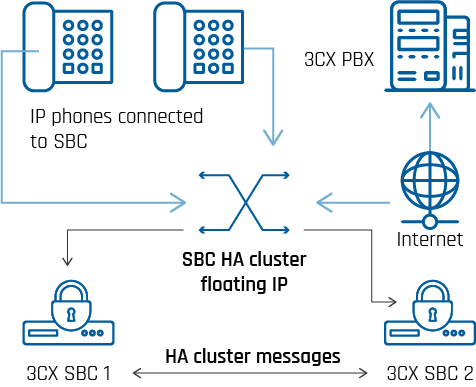
Connecting IP phones via an SBC (Session Border Controller) can be a single point of failure, if the SBC service host goes offline. To overcome this possible risk, you can create an SBC High Availability (HA) cluster to operate in active-passive mode. With the SBC cluster in place, the SBC member nodes are behind the cluster’s floating LAN IP, managed by the currently active host. Remote IP phones can then transparently connect via the activated passive SBC host when the primary SBC host goes offline and vice versa. SBC HA cluster is based on crmsh, a cluster management shell for the Pacemaker High Availability stack. 

Prerequisites 

Create an SBC High Availability (HA) Cluster

Cluster member nodes must: 

  • be two (2) PCs or NX Series with the same Debian or Raspbian (9/Stretch) Linux version and updates. 
  • be configured in sequence, i.e. the active/primary node first and then the secondary/passive node. 
  • be configured with static LAN IPs on the same subnet and on the same time zone. Run this command on each node to avoid synchronization issues: 
  • timedatectl set-timezone your_time_zone 
  • have the same network interface names assigned to the same service, e.g. ens192 is assigned to the SBC service on each node. 
  • be able to communicate with each other without restriction. 
  • if the “Ping Resource” option is enabled, be able to send and receive ICMP (ping) messages to and from the specified ping targets. 
  • be connected to a v18 or later PBX.  
  • The HA cluster must be assigned a static LAN address as the floating IP. 

Creating the SBC HA Cluster

Creating the SBC HA Cluster

Use two identical machines to setup:

  • Run SBC HA cluster script on node.
  • Select network interface for the node.
  • Specify the IP for the other node.
  • Specify the cluster’s IP.
  • Install cluster & create resources.

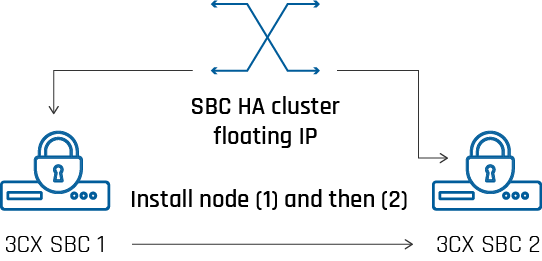
To create the SBC HA cluster first create an SBC connection i“SIP Trunks” via the 3CX Management Console and follow these steps consecutively on node (1) and then node (2) on the same subnet: 

1. Run this command to start the SBC HA cluster installation: 

  • wget http://downloads-global.3cx.com/downloads/sbccluster/3cxsbc.zip -O- | sudo bash 

2. Follow the guide to configure the SBC on your Linux host. Before installing, the script verifies the SBC host’s connectivity to the PBX. Ensure that: 

  • Your PBX host allows and responds to connections from the SBC member nodes. 
  • You use the same “Authentication Key ID” to configure SBC 1 and SBC 2. 

Using the NX32 as an SBC 13

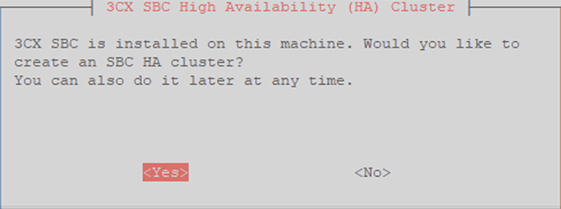
3. Once the SBC is installed, you are asked whether to create an SBC HA cluster. Select to proceed with the cluster installation and press . Using the NX32 as an SBC 14

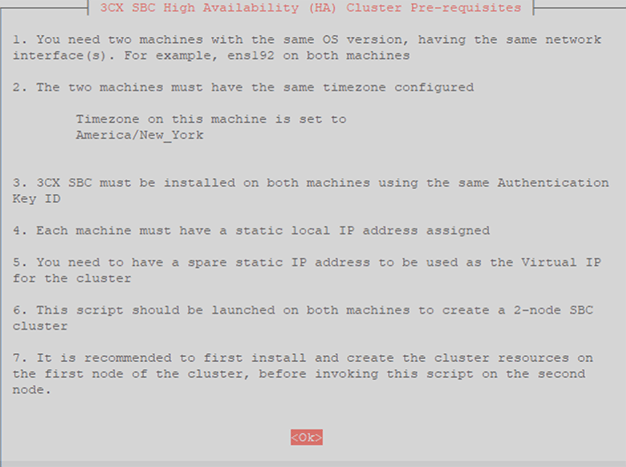
4. Read and verify the displayed requirements for installing the SBC HA cluster. Press <Enter> to continue. 

Using the NX32 as an SBC 15

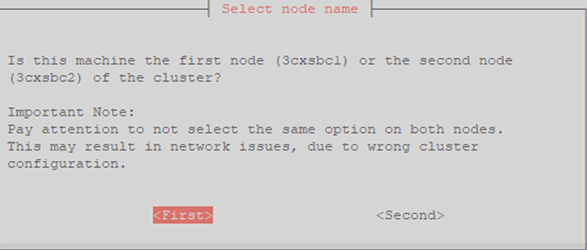
5. Select the node you are currently installing, i.e. “First” or “Second”, and press <Enter> to continue. Keep in mind that selecting the same option for both machines results in a misconfigured network and cluster. 

Select the network interface to use for the SBC service on this node and select <Next>. Remember that the network interface names on the First and Second nodes must be the same, as mentioned in the Prerequisites section above. 

6. If you are: 

  • Configuring SBC 1: enter the Static LAN IP of SBC 2. 
  • Configuring SBC 2: enter the Static LAN IP of SBC 1. 

Then select <Next> to proceed. 
7. Enter an unallocated LAN address to serve as the floating IP for the clustered SBC service running on both nodes. SBC 1 and SBC 2 must both be configured with this IP. Select <Next> to proceed.  
Select the same network interface that you selected in step #6. 

Using the NX32 as an SBC 16

8. Choose whether to enable the cluster’s “Ping Resource” option (recommended) for monitoring the nodes’ connectivity. Select: 

  • Yes” – Specify up to three (3) IP or FQDN addresses separated by space as ping targets and click on “<Next>”. 
  • No” – Disable the “Ping Resource” option. 

9. Verify the displayed SBC cluster info and then select <Confirm and install> to apply your configuration for this node. 
10. If you are installing SBC 1, select “<Create>” to initialize cluster resources for the first time and start the SBC service. Use “<Skip>” only when installing a replacement First / Active node, with cluster resources already created and the SBC service running on the activated Passive node. 

To add the second node wait ~30s for the first node to come up and then repeat the steps above. 

Updating the SBC Cluster Nodes

To update the SBC service on the cluster member nodes, go to “SIP Trunks” in the 3CX Management Console and follow these steps: 
1. Select the SBC connection and click on “Update”. This triggers the active cluster node (1) to update the SBC service to the latest version and reboot. When the previously active node (1) goes offline to reboot, the passive node (2) activates and connects to the PBX. 
2. Select the SBC connection and click on “Update” again. Now, this triggers the SBC service update on the currently active cluster node (2) and a subsequent reboot of this machine. 
3. When the previously active node (2) reboots, it triggers the already updated node (1) to become active and provide the SBC service for the cluster. 

Removing an SBC Cluster Node

To remove a member node from the SBC cluster, use these steps: 
1. Run the SBC HA cluster installation script:  

  • wget http://downloads-global.3cx.com/downloads/sbccluster/3cxsbc.zip -O- | sudo bash 

2. When prompted, select the option to uninstall the cluster. 
3. Select “Skip” when prompted to remove the cluster resources, unless you are also removing the cluster completely. 
4. Select the option to purge the SBC service. 

Known Issues and Limitations

Keep these points in mind when managing an SBC HA cluster: 

  • The clustering service must be configured as described with all prerequisites. Misconfiguration will result in a non-functional cluster and prevent network connectivity to/from its members. 
  • Active calls cannot be restored on an SBC cluster, i.e. from the active to the passive node. 
  • After a failover occurs, the newly activated SBC node can handle new calls after a few seconds. However full functionality like phone provisioning via the Management Console, can take up to two (2) minutes to be restored. 
  • If local network connectivity is temporarily disabled or broken for any of the member nodes, the clustering service may not recover when connectivity is restored. Ensure network connectivity between the member nodes, to avoid causing nodes to assume the active role concurrently and activating the cluster resources on both nodes. This issue is to be resolved in a subsequent Debian / Raspbian Linux version. 

Troubleshooting

  • To check the status of the SBC cluster, use these commands on any of the member nodes to: 
  • Show cluster and member nodes status:  
    – crm status 
  • Monitor the cluster activity live:  
    – crm_mon 
  • If you have misconfigured the cluster settings, the safest approach is to purge your settings and start again from the script installation, instead of trying to fix the issue manually.  
  • To get notified when failover events occur, enable the “When the status of a trunk / SBC changes” option in “Settings” > “Email” > “Notifications” tab. 
  • You can get detailed clustering service log messages for each node by running: 
    journalctl -l -u pacemaker.service -u corosync.service 
  • If a cluster is misconfigured, the connectivity between the member nodes can be compromised and nodes may lose connectivity or get stuck in a reboot loop. To resolve this situation, you need to block communication between the cluster members. The most simple solution is to: 
    1. Shutdown both nodes. 
    2. Start up only one node and after it boots, check the cluster status and SBC connectivity. 
    3. If you can verify the cluster status and connectivity, then you can attempt to start the second node. After boot verify again the status for the cluster and SBC connectivity. 
  • If the cluster and/or SBC service is still misconfigured, disconnect and  purge each node to replace the misconfigured settings with the commands: 
    – sudo apt remove –purge 3cxsbc crmsh pacemaker corosync 
    – sudo apt autoremove –purge  
    Then you can proceed to re-install the SBC HA cluster on each node from scratch.